
Resources
We all love to be up to date with tips and tricks of our craft and so here we have - and will grow - a library of sorts, where we can refer to some tips for all things pastel and other dry media.
First up - An article by Catherine McKeever on taking the best photos for submission to an online gallery.

More and more often artists are asked for photographic images of their work for online exhibitions or publicity and websites. We all put great thought and effort into our work and how we present it for exhibition but all that good work can be undone by poor online images. The steps needed to create and submit a good photographic image are not difficult once you know how, so here is a step by step guide to taking and submitting images of your paintings.
First of all you do not need any specialist equipment. Mobile phone cameras do a very good job of producing high quality images.
Fig 1
Paintings must be photographed before they are framed especially if they are to be framed under glass. It is good to get into the habit of photographing your work when it is finished.
This way you have a record of your work and an image for future use.
Lighting is important but again there is no need for specialist lights. Daylight is your best friend but not direct sunlight.
For me the best option is to set my painting on an easel either outdoors or beside a window on a bright day. Fig 1.
Make sure nothing is casting a shadow across your work including your own shadow or that of the camera. If you have to use artificial light try to use white light rather than yellow light which can distort colours.
Once you are happy with the set up prepare to take your photograph. The image of the painting should fill the view finder of the camera. Fig 4

Fig 2 - No!

Fig 3 - No!

Fig 4 - Yes!
It can be hard to hold a camera steady. It can help to lean your arms on the back of a chair to steady the shot. Fig 1.
I always leave a small margin of equal distance round my painting. Fig 4. I find the margin allows me to see the edge of the painting easier and ensure that I am holding the camera straight on the painting and not distorting it.
Check the photo immediately for the following,
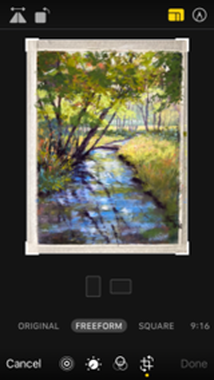
Fig 5 - Ready to crop
a) All edges of the image are vertical and horizontal to the edge of the view finder
b) You are happy that the colours in the photo are a close representation of the colours in the painting.
c) The image is not too bright or too dull.
d) There are no cast shadows.
e) Finally check that the photograph is not showing something in the painting that you are not happy with. Now is your chance to change it.
If you have left a margin round your painting now is the time to crop it to leave only the image that you want to keep. Fig 5. Once cropped zoom in on the edges of the image to check that you have cropped enough and the edges of the image are looking clean.
It may be necessary to repeat this process or part of it a few times until you are satisfied with the image.
Once you are happy with your image send it to your computer.
How to Save your Image
To save your image on your computer:-
Click on ‘Save as’ button.
Go to ‘File Name’ this is usually a series of letters and numbers. Delete the letters and numbers and replace them with,
Your Name, Title of your painting, the size in centimetres and the price. E.g. John Smith, Winter Sunshine, 40cm x 30cm, £250.
Now choose the file you wish to save it to and click the ‘Save’ button. You now have a saved image which can be attached to an exhibition entry with all the
information necessary for an online exhibition.
If all else fails ask someone to help you. I got my daughter to show me. It took a few trys before I could do it on my own.
Article by - USWA President Catherine McKeever January 2023